Side Dishes
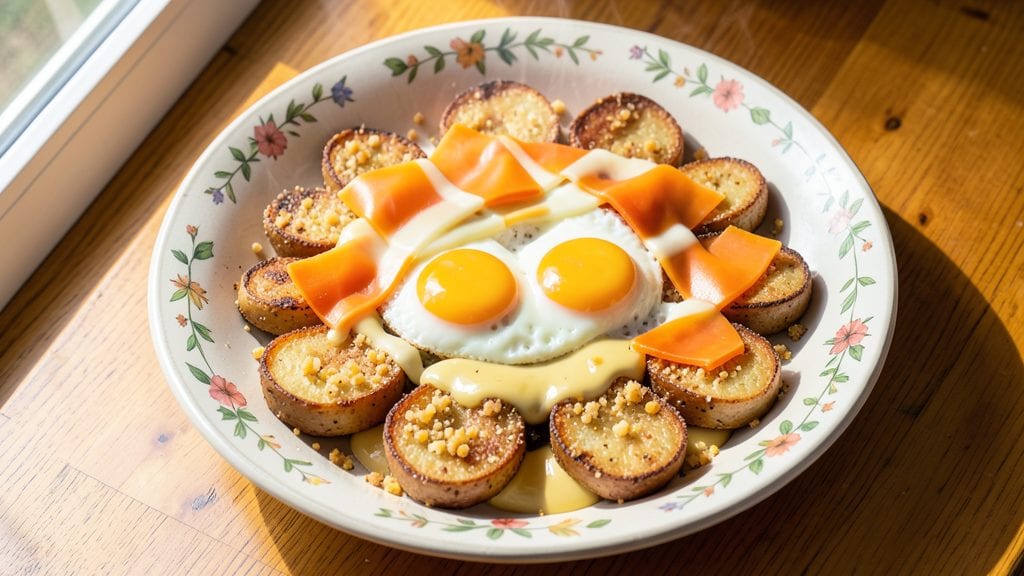
This picnic potato recipe transforms simple spuds into crispy, cheesy pull-apart bites perfect for outdoor feasts. The secret lies in a cornmeal crust that stays crunchy even when packed for hours—no soggy sides here.
I designed this dish after years of picnic disasters where potato salads turned to mush or baked potatoes lost their appeal by lunchtime.
The magic happens in two stages: baking the potatoes until tender, then coating them in a cornmeal-cheese mixture that creates that coveted crispy exterior. What makes this recipe truly picnic-friendly is how well it holds up—transport in a cooler for up to 4 hours, and the texture remains perfect.
The cheesy pull-apart element ensures everyone at the table gets their hands on the best bites first.
By the time you're ready to serve, you'll have golden-brown potato crowns with crispy edges and gooey, melted cheese centers that pull apart with every bite. These are the kind of potatoes that disappear fast, leaving only empty paper plates behind.
The best part? They're easy to make ahead and reheat quickly if needed—ideal for a stress-free picnic spread.
Serve these with a simple green salad and some cold drinks for a complete picnic menu that feels both elegant and effortless. The recipe scales perfectly for crowds, and the leftovers reheat beautifully for lunch the next day. Let's make picnic potatoes that actually impress!
Ingredients for picnic potato
Four crispy spuds, one cheesy crown that'll disappear at picnics. Game-changer ingredient list!
| Ingredient | Amount | Notes |
|---|---|---|
| Russet Potatoes 🥔 | 4 medium | Uniform size, unpeeled |
| Cornmeal 🌾 | 1 cup | Fine grind for best texture |
| Shredded Sharp Cheddar Cheese 🧀 | 2 cups | Freshly shredded preferred |
| Butter 🧈 | ½ cup | Melted, unsalted preferred |
| Eggs 🥚 | 2 large | Beaten for coating |
| Milk 🥛 | ¼ cup | Whole milk for creaminess |
| Garlic Powder 🧄 | 1 tbsp | Freshly ground preferred |
| Onion Powder 🧅 | 1 tbsp | For extra flavor depth |
| Salt 🧂 | 1 ½ tsp | Kosher salt preferred |
| Black Pepper 🌶️ | ½ tsp | Freshly ground preferred |
| Olive Oil 🫒 | 2 tbsp | For greasing baking sheet |
| Baking Powder 🍞 | ½ tsp | For extra crispiness |
The potatoes are non-negotiable—russets are your best bet for that fluffy interior. Trader Joe's and Whole Foods carry perfect medium-sized ones, but any grocery store's russet section works. Look for potatoes with smooth skin and no sprouts—those little eyes make them tough. I always buy a few extra because sometimes the sizes vary, and you want them all cooking at the same rate. Pro tip: Soak them in cold water for 30 minutes before baking to remove excess starch, which helps that cornmeal crust stick like glue.
No cornmeal? All-purpose flour works in a pinch, but you'll lose that signature crunch. The cheese? Sharp cheddar is a must—mild cheddar won't give you that melt you crave. Freshly shredded makes all the difference (pre-shredded gets clumpy), but if you're in a hurry, microwave the bag for 30 seconds to soften it up. Want to kick it up a notch? Add 1/4 cup crumbled bacon to the cornmeal mix—trust me, it's worth it. The garlic and onion powders are optional but seriously elevate everything. Skip them if you're sensitive to strong flavors, but I'd be sad if you did.
These reheat like a dream—oven at 350°F for 10-15 minutes is perfect. Store leftovers in an airtight container for up to 4 days, but honestly, they won't last that long. For picnics, pack them in a cooler with ice packs—they stay crispy for 4 hours this way. Double the batch and freeze half for another day. Just thaw overnight in the fridge before reheating. The cornmeal crust gets even crunchier after a night in the freezer, so it's a win-win.
Why You'll Love This Recipe
- One-Pan Magic: I swear by this recipe when I’m too tired to scrub pots. Slice those Russets, toss them with cornmeal and butter, and let the oven do the work—no flipping, no fuss. The eggs just get cracked right on top before baking, so you’re not even breaking out a skillet.
- Cheesy Crunch Perfection: That crispy cornmeal crust? Chef’s kiss. And the sharp cheddar melts into a gooey blanket while the eggs cook right into golden, runny centers. It’s the kind of dish where the first bite makes you go, “Wait, I made this?”
- Packable Picnic Power: Between us, this is my go-to for tailgates, beach days, or even a lazy Sunday. The potatoes stay warm (or cool, if you eat them that way), the eggs hold up, and the cheddar won’t slide off. Wrap it in foil, toss it in a basket—no one will guess it’s not from a fancy restaurant.
- Budget-Friendly Leftovers: Russets and cheddar are cheap, and this recipe stretches further than you’d think. I’ll make a double batch, reheat slices in the oven the next day, and still have enough for lunch. Honestly, the only waste is if you don’t save seconds.
Step-by-step instructions for crispy cornmeal crowns with cheesy pull-apart joy
Here's how to transform simple potatoes into an irresistible picnic centerpiece with golden crusts and melty cheese pockets!
Prep and Boil the Potatoes
First, scrub the 4 medium russet potatoes thoroughly under cold water to remove any dirt. Using a sharp chef's knife, cut each potato lengthwise into ½-inch thick slices—you should end up with about 16 slices total. I like to keep them uniform for even cooking.
Place the potato slices in a large pot and cover them completely with cold water. Add 1.5 teaspoons of salt to the water. Bring to a boil over high heat, then immediately reduce to a gentle simmer. Cook for exactly 5 minutes—you want them just slightly tender but still holding their shape when pierced with a fork. Drain immediately in a colander and let them cool for 5 minutes before handling further.
Create the Cheesy Cornmeal Coating
In a large bowl, whisk together the 2 large beaten eggs, 0.25 cup milk, 1 tablespoon garlic powder, 1 tablespoon onion powder, and 0.5 teaspoon black pepper until fully combined. In a separate shallow dish, mix the 1 cup cornmeal with 0.5 teaspoon baking powder and 1 teaspoon of the 1.5 teaspoons salt.
Next, melt the 0.5 cup butter in a small saucepan over low heat until completely liquid. Remove from heat and stir in the remaining 0.5 teaspoon salt. This buttery mixture will become the secret to that irresistible crispy crust. Let it cool slightly while you prepare the next steps.
Assemble the Potato Crowns
Working in batches to avoid sogginess, dip each potato slice into the egg mixture, letting any excess drip off. Then roll it in the cornmeal mixture, pressing gently to ensure even coverage. Place the coated slices on a parchment-lined baking sheet, leaving about ½-inch space between each piece.
Carefully spoon about 1 teaspoon of the melted butter mixture over each potato slice, then sprinkle with about 1 tablespoon of the 2 cups shredded sharp cheddar cheese. The cheese should be distributed evenly so every bite gets that gooey pull-apart magic. Work quickly to prevent the egg mixture from setting.
Bake to Crispy Perfection
Preheat your oven to 425°F while you finish assembling the potato crowns. Once everything is on the baking sheet, bake for 20-25 minutes until the edges are deep golden brown and the cheese is bubbling and beginning to brown in spots. The potatoes should be crispy on the outside but still tender inside.
For that extra-crispy texture, I like to broil for the final 2 minutes—watch them closely so they don't burn. The cheese should be melted and stretchy, pulling apart easily when you lift a corner. If any slices need a bit more color, return them to the oven for 1-2 minutes.
Serve Warm and Enjoy!
Transfer the crispy potato crowns to a serving platter and let them rest for 2-3 minutes. This resting time allows the cheese to set slightly, making it easier to serve without everything sliding off. Serve immediately while still warm and crispy—these are best enjoyed right out of the oven!
For an extra picnic-friendly touch, arrange them on a large platter with toothpicks for easy grabbing. The combination of crispy cornmeal crust, tender potato, and melty cheddar makes every bite irresistible. Don't forget to have wet wipes handy—these are messy but worth it!
Pro Tips For Making Picnic Potato
- SOAK THE POTATOES: I learned this the hard way—skipping the soak means your picnic potatoes turn out gummy instead of fluffy. Cut the Russets into ½-inch slices, toss them in cold water for 10 minutes, then drain thoroughly. The starch rinse keeps them from absorbing too much butter later.
- USE COLD CORNMEAL: Warm cornmeal loses its crisp bite, and that’s the whole point. Mix it with the shredded cheddar before adding the potatoes—this way, the cold cornmeal stays firm and creates that perfect crunchy layer. No need to preheat it; just stir it in cold.
- DON’T OVERMIX THE EGGS: Too much whisking turns the egg wash into glue, and your potatoes end up soggy. Whisk just until the yolks and whites blend—about 10 seconds—then fold in the cornmeal-cheddar mix. Lumpy is fine; gluey is not.
- BAKE IN TWO BATCHES: Crowding the pan steams the potatoes instead of browning them. Spread them in a single layer on the baking sheet—no overlaps—and if your pan is big enough, do a second batch. The extra time ensures crispy edges, not a sad, damp mess.
Pro cooking tips for picnic potato
Perfect Potato Prep
Start with russet potatoes—they’re the secret to fluffy interiors. I always scrub them first to remove dirt, then cut them into ½-inch thick slices for even cooking. The key is partial boiling: just 5 minutes in salted water until slightly tender but still firm.
Overcooking here makes them mushy later. Drain well and let them cool for 5 minutes before handling—they’ll be hot! 🥔
Crispy Coating Secrets
The cornmeal-cheese crust needs three layers for maximum crunch: egg wash, cornmeal mix, and melted butter. I use fine-ground cornmeal for the best texture—all-purpose flour works in a pinch but lacks that signature bite.
Press the coating gently into each slice so it sticks. For extra flavor, add ½ teaspoon baking powder to the cornmeal mix—it creates tiny air pockets for extra crispiness. 🌾
Cheese Melting Magic
Sharp cheddar is non-negotiable—it melts perfectly and has that tangy punch. I melt ½ cup butter with the remaining ½ teaspoon salt for the drizzle, then let it cool slightly before spreading. The butter helps the cheese brown beautifully.
For pull-apart perfection, distribute the cheese evenly—1 tablespoon per slice—and bake until bubbly. If your cheese isn’t melting, it might be too cold; let it sit at room temperature for 10 minutes before using. 🧀
Oven Temperature Control
Preheat your oven to 425°F—this high temp ensures a golden crust in 20-25 minutes. I always use parchment-lined baking sheets for easy cleanup. For that restaurant-quality finish, broil for the last 2 minutes, but watch closely—it burns fast!
The internal temp should reach 165°F for food safety. If any slices need more color, return them to the oven for 1-2 minutes. 🔥
Picnic Packing Pro Tips
Transport these in a cooler with ice packs—they stay crispy for 4 hours this way. For reheating, pop them in the oven at 350°F for 10-15 minutes. Store leftovers in an airtight container for up to 4 days.
Double the batch and freeze half for another day—just thaw overnight in the fridge. The crust gets even crunchier after freezing! ❄️
Serving Like a Pro
Arrange the crowns on a large platter with toothpicks for easy grabbing—perfect for picnics! Serve with a cool green salad and cold drinks to balance the richness. For extra flair, sprinkle with fresh parsley or a pinch of smoked paprika right before serving.
These disappear fast, so make extra if you’re feeding a crowd! 💫
Nutrition facts
Frequently asked questions
Can I make these potato crowns ahead of time for a picnic?
Assemble the cornmeal-coated potatoes up to 24 hours ahead and refrigerate uncovered on a wire rack. This prevents sogginess. Bake them fresh before packing for the picnic—this ensures maximum crispiness. For transport, place them in a cooler with ice packs and they'll stay perfect for 4 hours. If reheating, bake at 350°F for 10-15 minutes.
What's the best way to keep these potatoes crispy during transport?
The key is proper packaging and temperature control. Place the baked potatoes in a single layer on a baking sheet, then cover loosely with aluminum foil. Pack them in a cooler with ice packs (not touching the potatoes) to maintain 40°F or below. Avoid plastic containers—they trap moisture and make the crust soggy. For extra insurance, sprinkle a tiny bit of cornstarch on the foil before covering.
Can I use sweet potatoes instead of russets?
You can try, but russet potatoes are ideal for this recipe. Sweet potatoes have more moisture and a different texture that won't work as well with the cornmeal crust. If you're set on sweet potatoes, reduce the baking time to 18-20 minutes and use 1 extra tablespoon of cornmeal per potato to absorb the extra moisture. The flavor will be different, but the technique remains similar.
How do I fix potatoes that came out soggy?
Soggy potatoes usually mean one of two things: either the potatoes were over-boiled or the oven wasn't hot enough. For next time, boil them for exactly 5 minutes and preheat the oven to 425°F. If you already have soggy potatoes, try reheating them in a 400°F oven for 10 minutes with a sprinkle of cornmeal on top to restore some crispiness. For immediate fixes, broil for 1-2 minutes on high.
What are some great picnic pairings for these potato crowns?
These cheesy potato crowns pair perfectly with cool, refreshing sides. Try a crisp cucumber salad with lemon vinaigrette, chilled watermelon slices, or pickled vegetables to cut through the richness. For drinks, iced herbal tea or sparkling lemonade complement beautifully. Don't forget paper plates and napkins—these are messy but worth it!